Mastering Blazor WebAssembly .NET 8.0 Book Notes

.NET 8.0 is out, and it arrived with huge upgrades and improvements to the ecosystem. Blazor has a big chunk of those upgrades and in some sense, it got revolutionized. Blazor has been growing at a fast and consistent pace since it was launched back in 2019. The most exciting piece that all .NET developers were waiting for is what has been known as Blazor United, the new template that will bring the power of Razor pages, Blazor Server, and Blazor WebAssembly into a single project. .NET 8.0 delivered its promise and brought the new Blazor Web App template that allows for full-stack web development in a modern and out-of-the-box fashion. If you would like to learn more about the new Blazor Web App template, check out the following YouTube video from Microsoft What's New in Blazor for .NET 8. When it comes to Blazor WebAssembly itself, there were some minor changes and overall improvements, but your experience in developing WebAssembly standalone apps won't be affected that much.
By August 18th of this year, I announced my first book Mastering Blazor WebAssembly. I started writing the book during the period of .NET 6.0 and shipped with .NET 7.0 full support. Now with .NET 8.0 released here are the changes, improvements, and differences that you will keep the reference compliant with the latest changes and up-to-date for one more year.
The changes will be listed using the same book chapter sequence, so you can easily get what's new in .NET 8.0 with WebAssembly and also link that to the right chapter in the book.
Chapter 1: Understanding the Anatomy of a Blazor WebAssembly Project:
In the chapter where introduces you to the Blazor WebAssembly project, and some basic topics like dependency injection, and managing application environments. Here are the modified things in .NET 8.0:
Blazor WebAssembly templated is renamed from Blazor WebAssembly to Blazor WebAssembly Standalone App. So when creating a WebAssembly project from Visual Studio, you should see the new name of the template.
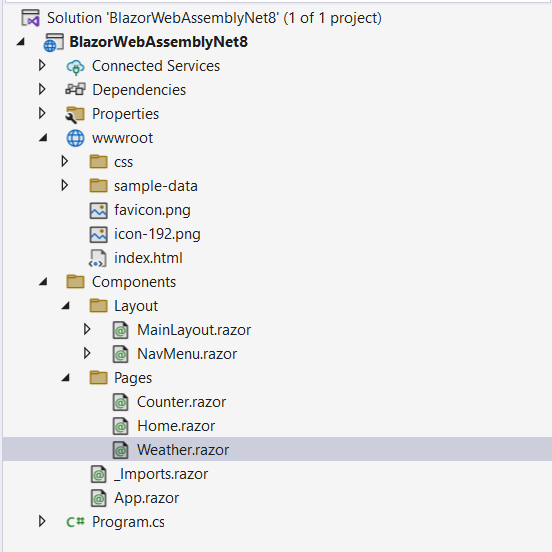
Blazor WebAssembly default project structure got some slight modifications. The new project will look like the following:

Instead of the Shared and Pages folder, they have been merged into a new Components folder, and the FetchData.razor page has been renamed to Weather.razor (a more meaningful name ;-) rest of the stuff is most likely the same.
- Dependency Injection (DI): In .NET 8.0 Microsoft introduced the idea of the Keyed DI Services, in short, the idea is instead of registering a single service for example:
The previous way lacks the ability to register multiple instances from the same interface, as the runtime won't be able to decide which service to retrieve. Using Keyed DI Services you can register as many services as you want and give each one a key, so when you inject that service inside a component, you can provide the key for the instance you want to inject. For example, you can register multiple ILoggingService instances as follows:builder.Services.AddScoped<ILogginService, ConsoleLoggingService>();
Now inside the component, if you want to inject a specific service you can use the attribute [Inject] with the new Key property to define the key of the service to inject as shown below:builder.Services.AddScoped<ILogginService, ConsoleLoggingService>("console"); builder.Services.AddScoped<ILoggingService, AppInsightsLoggingService("appinsights");
You can learn more about Keyed DI services Here.// Razor component file [Inject(Key = "console")] public ILoggingService LoggingService { get; set; } ...
Chapter 2: Components in Blazor:
This chapter is where the actual interesting stuff takes place, you will learn about the components model in Blazor, how to create your first component, learn about parameters and how to send data between the components, the component's life-cycle, and finally how to style a component in Blazor. The changes here are not big but here are some interesting features that have been added to .NET 8.0:
- Root-Level Cascading Values and Parameters: As you will learn on page number 42, the Cascading values and parameters section and how to pass data in the components hierarchy. A new little feature was added in .NET 8.0 that provides the ability to add a cascading value on the root level of all the applications, instead of doing this through the App.razor, now you can register that value in the Program.cs as shown below:
With this now from any component you can have access to both values as follows:builder.Services.AddCascadingValue(sp => new ThemeSettings { Color = "White" }); // Inject a cascading value with a name builder.Services.AddCascadingValue("Brown", sp => new ThemeSettings { Coor = "Brown" });
You can learn more about the Root-Level Cascading Values Here.[CascadingParameter] public ThemeSettings WhiteTheme { get; set; } [CascadingParameter(Name = "Brown")] public ThemeSettings BrownTheme { get; set; } - Sections support: Blazor WebAssembly now allows rendering sections. The idea of sections is that in a certain component of your app, you can define an Outlet for that section, and then in any component, you can define some markup that will be rendered in the Outlet whenever that component is rendered in the UI.
To understand sections better, consider an example of an eCommerce app, the top bar of the app is within the layout component, but if the user is inside a product page you want to render an Add To Cart button at the top bar, or if the user is within the shopping cart page, you want to render a Check-Out button instead. Sections here made such a feature is very handy.
Here is how to get such a thing done using Section:
1. In the Layout file, add a SectionOutlet component inside the top bar as shown:
<div class="top-bar"> <SectionOutlet SectionName="top-bar-right-content" /> </div>- In the Product component or page, you can add a section called
top-bar-right-contentthat will be rendered in the layout as shown:
You can learn more about sections in Blazor ASP.NET Core Blazor sections | Microsoft Learn<SectionContent SectionName="top-bar-right-content"> <button class="btn btn-primary" @onclick="AddToCart">Add to Cart</button> </SectionContent> - In the Product component or page, you can add a section called
Chapter 3: Developing Advanced Components in Blazor
Chapter 3 where you will level up your skills and knowledge in developing Blazor components. Advanced components will include the layouts, templated and generic components, and how to render components dynamically. If you are starting with .NET 8.0, the content of this chapter won't be impacted, and the content doesn't have almost any additions, so you are just good. It's just good to mention the newly added component in Blazor to render data professionally which is called QuickGrid. QuickGrid is an advanced data grid component that allows you to render a collection of data with some processing capabilities like sorting and more. You can check out how to use the new QuickGrid [Here](ASP.NET Core Blazor QuickGrid component | Microsoft Learn)
Chapter 4: Navigation and Routing:
This chapter will teach you about how routing and navigation work in Blazor WebAssembly, and you will learn about how to receive values from the URL through parameters, and other things related to routing like handling the not-found URLs, and how to take actions whenever the user navigates from one page to another inside the same app. Blazor WebAssembly in .NET 8.0 has two good features related to navigation and routing.
Cascade query string values to Blazor components: You can now receive query string parameter values from the URL in any component, not just
@pagecomponents, using the[SupplyParameterFromQuery]attribute. For example:[SupplyParameterFromQuery] public int PageIndex { get; set; }It is no longer necessary to add the
[Parameter]attribute to any property that declares[SupplyParameterFromQuery].Route to named elements: Finally, you can navigate to specific named HTML elements in your UI, for example, if you have a
divwith theid="book-cover", now Blazor supports routing by scrolling to that element when the URL references the fragment as following:http://BASE_URL/Book#book-cover
Chapter 5 (no changes): Capturing User Input with Forms and Validation:
The chapter covers the soul of any piece of software which is reading data from the user, and shows all the ins and outs of the process. The content of this chapter won't be affected as most of the changes occurred in .NET 8.0 hit the new Blazor Web App and not the WebAssembly part, so you are good to go.
Chapter 6 (no changes): Consuming JavaScript in Blazor:
Here you will learn about C# and JavaScript hand in hand while building an advanced single-page application (SPA) and the why behind this communication. One of the coolest things about utilizing JS in your Blazor app is the ability to bring existing JS packages and libraries and get it to work in your app. Also, this section is not affected by any new .NET 8.0 improvements.
Chapter 7 (no changes): Managing Application State:
One of the important aspects of an application is to provide the user with a delightful user experience. Also this section doesn't have any improvements from .NET 8.0 in WebAssembly.
Chapter 8 (no changes): Consuming Web APIs from Blazor WebAssembly:
By this chapter you will be able to do great things with WebAssembly, this chapter shows you how to call Web APIs from a pure client-side perspective. No changes here from the .NET 8.0.
Chapter 9 (no changes): Authenticating and Authorizing Users in Blazor:
Up to this point throughout the book, you can have an application that works, but you need users, to allow them to register, log in, and more. This chapter will provide you with all that you need from high to low-level knowledge and skills to cover any authentication or authorization scenario you may face while building an app. The stuff you will learn in this chapter will be fully valid for any .NET 8.0 Blazor WebAssembly project, also it will provide you with the required knowledge to deeply understand how authentication is also working in the new Blazor Web App template.
Chapter 10 (no changes): Handling Errors in Blazor WebAssembly:
Learn how to handle errors in your Blazor WebAssembly to provide an efficient and reliable user experience to your users. Also there nothing new to mention regarding .NET 8.0 changes for WebAssembly
Chapter 11: Giving Your App a Speed Boost:
Nothing is more enjoyable than speed and being fast that's also the case for Blazor WebAssembly apps. In this chapter, you will learn a set of mechanisms and techniques to develop faster and more optimized Blazor WebAssembly apps. .NET 8.0 brings tons of underlying improvements to Blazor WebAssembly. luckily nothing you need to do to take advantage of those features, but it's good to note that WebAssembly is now faster due to the enablement of Single Instruction Multiple Data (SIMD) for WebAssembly, in short SIMD allows executing instructions on multiple data points in parallel, that leads to faster processing for data-intensive applications and increase the reliability of the client apps. Another performance improvement in .NET 8.0 and WebAssembly is the introduction of jitepreter. A new runtime that enables partial Just in Time (JIT) compilation for the WebAssembly modules. jitepreter allows for a faster apps and processing for the .NET code, and based on what Microsoft in showing in their charts, it sometimes reaches up to 200% faster, you can learn more about jitepreter here: ASP.NET Core updates in .NET 8 Preview 2 - .NET Blog (microsoft.com)
Chapter 12 (no changes): RenderTree in Blazor:
The chapter that explains a bit of the Blazor WebAssembly magic, how it works, and what is the RenderTree plays the main role in rendering the components in the UI and manipulating the DOM in a very efficient way. RenderTree stays the same from a high-level point of view in .NET 8.0, it's just internally its diffing algorithm that detects the differences between what's currently in the DOM and the changes to be re-rendered got improved in a more performant way.
Chapter 13 (no changes): Testing Blazor WebAssembly Apps:
Discover the magic of bUnit - a testing library for Blazor components, and in this chapter, you will not only learn about unit testing for components from a high level, you will also be introduced to the concept, its benefits, and writing 11 different unit tests that cover different cases techniques so you can write efficient tests for your application components and leverage the best out of bUnit.
Chapter 14: Publishing Blazor WebAssembly:
Nothing like publishing an app after an enjoyable and interesting development journey. .NET 8.0 brought many improvements to Blazor WebAssembly for a more compact release that launches faster and more reliably.
- Webcil packaging for Blazor WebAssembly apps: Webcil is a new web-friendly packaging for .NET assemblies, it removes any content that's Windows-related to avoid any issues when deploying to any environment that blocks the
.dll. By default, webcil is not enabled, and you can enable it from the.csprojfile as follows:<PropertyGroup> <WasmEnableWebcil>true</WasmEnableWebcil> </PropertyGroup> - Removing of the ASP.NET Core Hosted model: Blazor WebAssembly template no longer allows the creation of an ASP.NET Core hosted project that's mentioned in chapter 14, if you would like to build a Blazor WebAssembly project with a direct backend, you need to consider using the new Blazor Web App template. All you have to do to stay up-to-date is just to skip the Introducing Blazor WebAssembly ASP.NET Core Hosted section.
You can learn more about publishing Blazor WebAssembly projects from here: Host and deploy ASP.NET Core Blazor WebAssembly | Microsoft Learn
Conclusion:
If you already purchased the Mastering Blazor WebAssembly or are willing to do so, .NET this little article is all that you need to stay up-to-date with the new features of .NET 8.0 for Blazor WebAssembly. Have an enjoyable and useful read, and don't forget to leave your feedback, it's important to get the next edition tailored to your needs.


Ahmad Mozaffar
651 days agoThis is a test comment